
Table of Contents
ToggleInstalling a Nest Thermostat isn’t rocket science, but getting the wiring right is non-negotiable. Whether you’re upgrading an old mercury thermostat or replacing a programmable model, understanding color-coded wire functions will save you headaches and keep your heating and cooling system running smoothly. This guide breaks down Nest thermostat wiring in plain terms, from identifying wire colors to troubleshooting common mistakes. You don’t need a degree in HVAC, just patience, a labeler, and this roadmap.
Key Takeaways
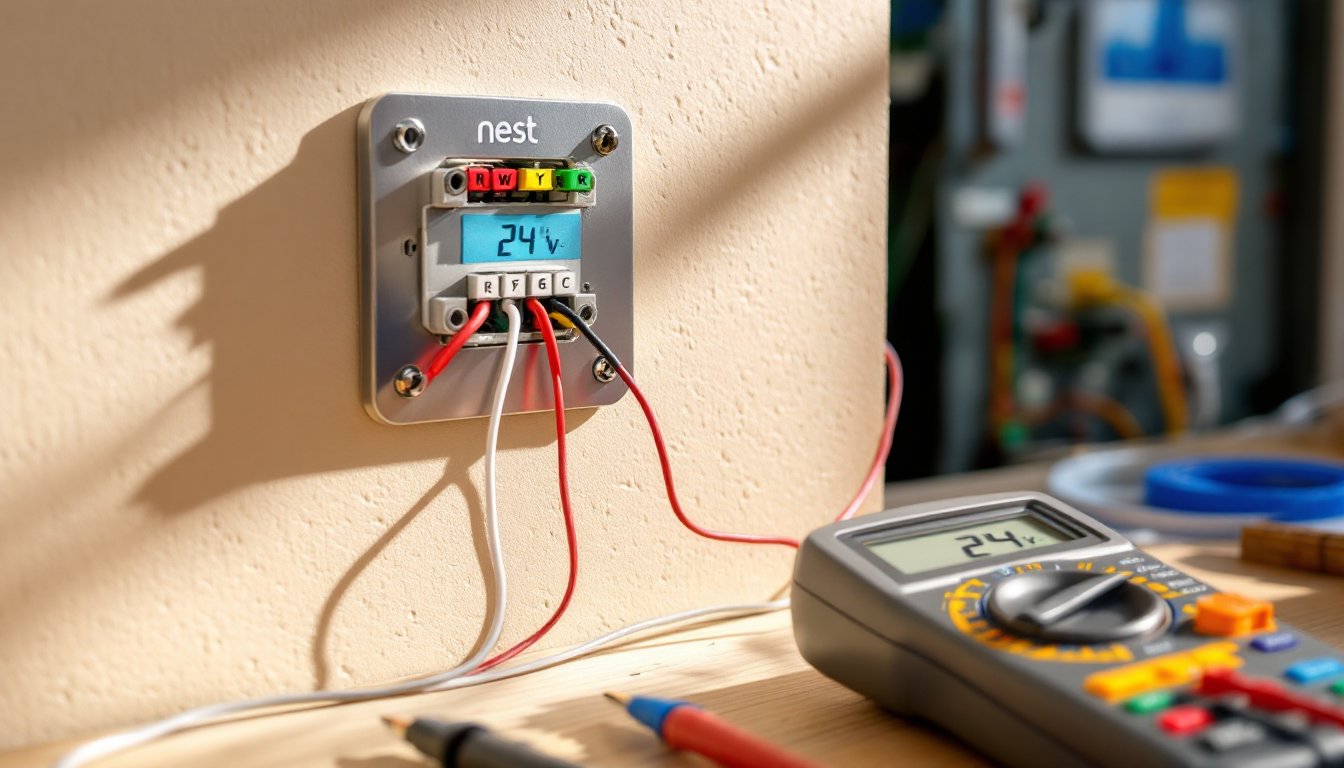
- Understanding Nest thermostat wire color codes—red for power, white for heat, yellow for cooling, green for fan, and blue for common return—is essential before beginning any installation.
- Label every single wire with painter’s tape and a permanent marker at both the old thermostat and furnace before disconnecting anything to prevent costly mistakes.
- A Nest thermostat wiring diagram should be photographed or documented from your existing system, and a C-wire (common wire) is strongly recommended for stable power delivery.
- Follow a step-by-step installation process: power off at the breaker, remove the old thermostat, prepare the backing plate, reconnect wires to matching terminals, and test both heating and cooling before completion.
- Common wiring issues like system won’t power on, heat runs continuously, or AC won’t kick in can be resolved by reseating wires, checking terminal connections with a multimeter, and verifying proper labeling.
- If your home lacks a C-wire or the installation feels uncertain, consult your furnace manual, use Google’s Nest compatibility checker, or hire a licensed HVAC technician rather than risking system damage.
Understanding Nest Thermostat Wire Colors and Their Functions
Common Wire Color Codes Explained
The color of each wire running from your furnace or heat pump to your old thermostat tells you its job. Nest uses the same standard color code as most HVAC systems, so if you’re familiar with any thermostat installation, you’ll recognize the pattern.
Red carries 24V power from your heating system. This is your power supply: without it, nothing works.
White controls your furnace heat. When your home needs warmth, the thermostat sends a signal through this wire to fire up the heating element.
Yellow handles air conditioning. It’s the cooling counterpart to white, this wire tells your AC compressor to kick in when the temperature climbs too high.
Green is your fan wire. It tells the blower motor to run, pushing conditioned air through your ducts. Some systems run the fan continuously: others cycle it on demand.
Blue typically serves as a common return wire, completing the circuit back to your furnace. Not all systems use blue, some use black instead. If your system has a blue wire, label it clearly.
Orange controls heat pump reversing valves (used in dual-fuel or heat pump systems). If you don’t have a heat pump, you won’t see this wire.
Brown sometimes appears as an auxiliary heat wire on heat pump systems. It’s less common in standard furnace setups.
The most critical rule: label every single wire before you disconnect anything. Wrap painter’s tape around each wire at both ends, at the old thermostat and at the furnace control board. Write the color name directly on the tape. Yes, it takes five minutes. No, you can’t skip it. Unlabeled wires are how DIYers end up calling a professional for a $150 service call.
Reading Your Existing HVAC Wiring Diagram
Before you touch anything, photograph your old thermostat’s wiring or grab the wiring diagram from your furnace manual. Your diagram is a treasure map showing exactly which wire goes where. Most Nest models come with a compatibility checker on Google’s website, use it. Snap a photo of the terminal labels on your old thermostat (they’re usually printed right on the faceplate), and the checker will tell you if Nest will work with your setup.
If your furnace is 15+ years old, its wiring diagram might be tucked inside the unit’s access panel or available from the manufacturer’s website. Write down the furnace model number (it’s on the nameplate on the side of the unit) and search online. Modern smart thermostats like Nest work with 95% of residential HVAC systems, but a handful of unusual multi-stage or commercial setups require professional installation.
Look for the Common wire (C-wire) in particular. Nest thermostats prefer a C-wire because it provides steady 24V power. Older thermostats often skip the C-wire, and many older installation guides treated it as optional. With Nest, it’s strongly recommended. If your system lacks a C-wire, you have two options: run a new wire from the thermostat location back to the furnace (messier but doable), or use a Nest Power Connector (a small adapter that lets Nest draw power from the heating cycle without needing a dedicated C-wire). The Power Connector works, but a real C-wire is cleaner.
Sketch a quick diagram on paper: draw five boxes for W, Y, G, R, and C. Write down which wires you actually have. This one-minute step prevents 90% of installation mistakes.
Preparing Your Home for Nest Installation
Safety Precautions Before You Begin
Turn off power to your furnace at the breaker. Seriously. Nest thermostat wiring runs on low voltage (24V), which won’t kill you, but if you accidentally short the heating circuit while poking around, you could damage the control board or trigger a safety shutdown. Flip the breaker, test the old thermostat to confirm it’s dead, and take a photo of the breaker position so you remember which one it was.
Gather your tools: a digital multimeter (under $15), a small flashlight, painter’s tape, a permanent marker, a screwdriver set, and needle-nose pliers. The multimeter is your safety net, it confirms whether wires are live or dead before you touch them.
Clear the workspace around your old thermostat. You’ll need room to work without your arms tied behind your back. Locate your furnace or heat pump unit (usually in a basement, crawlspace, attic, or utility closet) and note how far the wires run. If you need to pull a new C-wire and the distance is more than 50 feet or requires running through walls, call a professional. It’s not worth fishing wire through finished walls unless you know what you’re doing.
Double-check your Nest box contents: thermostat body, backing plate, wall anchors, screws, and the labeling tool. Missing hardware is frustrating mid-project.
Set your phone timer for 45 minutes. Most installations take 20–30 minutes if you’re organized. If you hit 45 minutes without finishing, stop, recheck your work, and troubleshoot before powering back on. Rushing at the end causes mistakes.
Step-by-Step Nest Thermostat Connection Process
Step 1: Turn off power and photograph the old thermostat.
After killing the breaker, use your phone to photograph the old thermostat from the front, showing all terminal labels and which wire sits in which slot. Zoom in so the labels are legible. This photo is your backup reference if you get confused.
Step 2: Remove the old thermostat body and label all wires.
Unscrew the old unit and gently pull it away from the wall. You’ll see the wire terminals on the back. Take your painter’s tape and permanent marker. Wrap tape around each wire, one at a time, and write its color and the terminal it came from (e.g., “Red, R” or “White, W”). Do this for every single wire, including any unlabeled extras. If a wire isn’t connected to a terminal, still label it: it might serve a purpose in the Nest installation.
Step 3: Disconnect the old thermostat.
Loosen the terminal screws and pull each wire free. Keep them organized, don’t let them flop back into the wall. If you’re concerned about losing them, secure them with tape to the backing plate or wall temporarily.
Step 4: Prepare the backing plate.
Nest includes a backing plate with terminal labels. Hold it against the wall where your old thermostat sat. Use a level to confirm it’s straight. Mark the screw holes, drill pilot holes (or use the wall anchors if you’re in drywall), and screw the backing plate in place.
Step 5: Reconnect wires to the Nest backing plate.
Match each labeled wire to its corresponding terminal on the backing plate (R, W, Y, G, C). Strip about 3/8 inch of insulation from each wire using a wire stripper or your teeth if the insulation is soft. Loosen the terminal screw, insert the bare wire, and tighten firmly. Tug each wire gently to confirm it’s snug. Loose connections cause intermittent problems.
Step 6: Attach the Nest thermostat to the backing plate.
Once all wires are seated, snap the Nest body onto the backing plate. It should click securely. Power the system back on at the breaker.
Step 7: Configure Nest using the app.
Follow the on-screen setup in the Nest app or on the thermostat’s touch screen. The system will walk you through identifying your furnace type, heating fuel (gas or electric), and cooling system. Answer honestly, mistakes here cause heating or cooling failures. Test both heating and cooling if possible (or wait for the season to arrive).
Troubleshooting Common Wiring Issues
System won’t power on.
Confirm the breaker is actually on. Use your multimeter to check for 24V across the R and C terminals on the Nest backing plate. No voltage? The furnace control board might not be sending power, or your C-wire connection is loose. Reseat all wires, especially the red (R) and blue or black (C) wires. If you still see zero volts, the furnace control board might be faulty, call a professional.
Heat runs all the time.
You likely connected the W (heating) wire to the wrong terminal, or it’s shorted to R. Turn the system off, remove the Nest, and inspect the W wire’s connection. Make sure it’s isolated in its own terminal and not touching any other wire. Recheck your labeling. If the label is wrong, the wire assignment is wrong.
Air conditioning won’t kick in.
Verify the Y (cooling) wire is properly seated in the Y terminal. Some older systems have two Y wires (for two compressor stages): make sure you’ve used the right one. If Nest shows “cooling on” but your AC unit isn’t running, the issue might be at the furnace control board side. Trace the Y wire back to the furnace and confirm it’s connected to the correct terminal there. Swap or test isn’t always intuitive, your furnace manual or a photo of the original wiring diagram is essential.
Furnace runs but won’t stop.
This usually means the W wire is shorted or the thermostat is sending continuous “heat on” signals. Power down, remove Nest, and inspect the W wire for damage or contact with other conductors. Check the terminal screw, is it tight? Sometimes a loose connection creates intermittent shorts. If the wire insulation is cracked or frayed, carefully wrap it with electrical tape and reseat it.
“No C-wire detected” error.
If you don’t have a C-wire run back to the furnace, Nest will complain. Option 1: Run a new wire from the thermostat location to the furnace control board and connect it to the “C” terminal. Option 2: Use a Nest Power Connector, which allows Nest to steal small amounts of power from the heat cycle. It works, but the C-wire solution is more reliable. Resources like this Nest installation guide and Family Handyman’s thermostat tutorials walk through both approaches in detail.
Thermostat is unresponsive or resets constantly.
Likely causes: weak power supply (loose C-wire or R-wire), poor Wi-Fi signal, or a failing furnace control board. Start by reseating the R and C wires at both the thermostat and furnace ends. Move your phone next to the Nest and run a Wi-Fi speed test, if signal is under -70 dBm, interference is probable. Reposition your router or ask your internet provider about a mesh network extension. If none of that helps, the furnace control board might be aging out: you’d need a professional replacement.
Always power down before reseating wires. Use your multimeter to confirm circuits are de-energized. When in doubt, stop and consult your furnace manual or the Nest support site. A 20-minute phone call with a pro can save hours of trial-and-error.
Final Thoughts: Nest Wiring Done Right
Nest thermostat installation is a weekend project for confident DIYers, label your wires, match colors to terminals, and test before closing up the walls. The hardest part isn’t the wiring: it’s resisting the urge to skip labeling and power testing. Take your time, trust the color code, and you’ll have a smart thermostat running flawlessly for years. If any step feels fuzzy or your system behaves oddly after installation, This Old House’s renovation guides and other trusted sources offer deeper dives. When in doubt, call a licensed HVAC technician, it’s worth the service fee to avoid a heating emergency in January.